Multi-Tenant Applications with Vivaldi for MySQL
Beginning with Vivaldi 2.3, you can create multi-tenant web
applications where your users see different application names,
logos, and data based on a unique identifier assigned to groups
of users.
Assigning Identifiers to Users
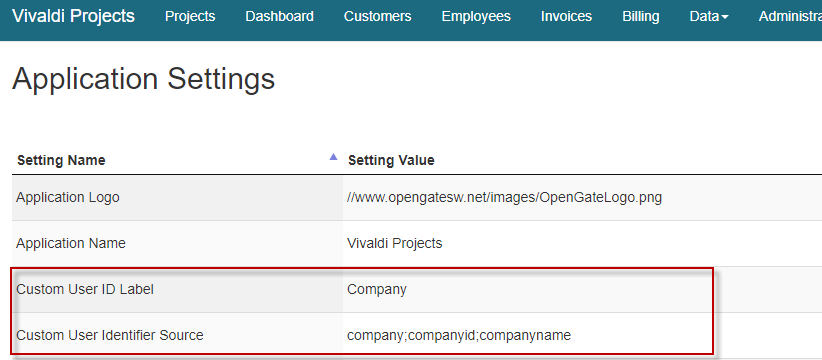
You can assign a tenant identifier to users when you create user records. To make the custom identifier available on the New User screen:- Navigate to Application Settings (Administration>>Application Settings from the menu).
- Click 'edit' for the Custom User ID Label property.
- Enter the label you want users to see when they add a new user account.
- Click 'edit' for the Custom User Identifier Source property.
- If you want users to enter a number when creating a new user account, enter 'text' in the property. If you want to display a dropdown, then enter YourTableName; YourIDColumn;YourTextColumn (separated by semi-colons) in the property. For example: tblCompany;companyid;companyname will display the company name, and store the company id with the user.

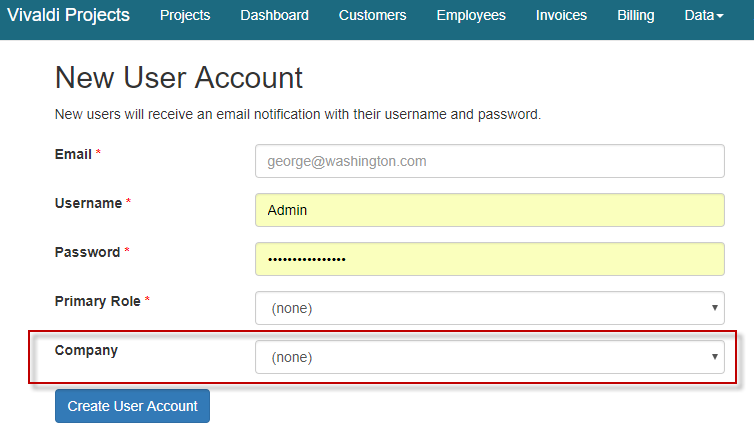
Now when you create new user accounts, a text field or dropdown will appear with your designated caption.
Additional tips:
- You can update or access the user's assigned identifier in the column custom_id in ogs_user
- When the user is logged in, the session variable $_SESSION['customuserid'] can be accessed to collect their assigned identifier.
- You can add the custom_id field to the Users system forms to access and edit the data for existing users. These fields will not be removed when you upgrade to a new version.
- Set 'Custom User ID Required' to 1 if you want to require all new user accounts to have a chosen Custom User Identifier before saving the new user.
Displaying Unique Logos and Application Names
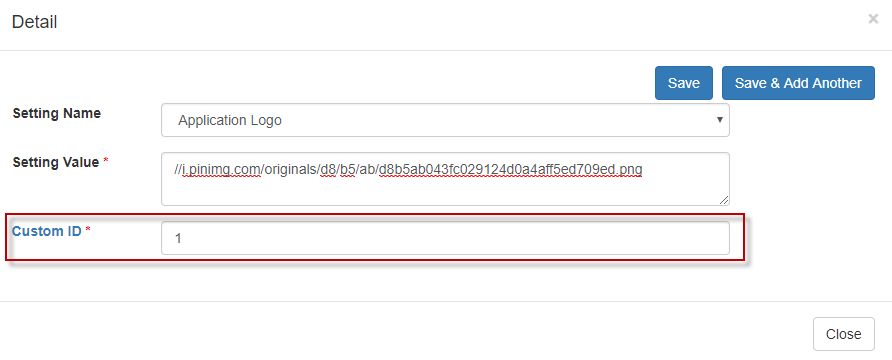
You can define a unique logo and application name for each tenant identifier. To define the logo and/or application name to use for a custom identifier associated with users:- Navigate to the Menu Designer (Menus>>Menu Designer)
- Add a new menu item wherever you would like to see it.
- Use the Wizard to set the Target URL property, locate the form 'Application Settings by User Stripe (Table)
- Assign your role (e.g., Super Admin) to the menu item via the Menus>>Role Assignments menu option
- Navigate to your new menu item.
- Click 'New' in the Application Settings by User Stripe table.
- Enter the custom identifier you want to associate with your property.
- Choose the property you want to define from the Setting Name dropdown.
- Enter the Setting Value (e.g., logo URL or application name).
Limiting Data to Users' Tenant
You can limit what data users are able to view in your forms by adding a tagged reference to their assigned custom_id. To do so, modify your form SQL criteria to include the tag: [customuserid]. For example: SELECT * FROM YourTable WHERE YourTenantStripeField=[customuserid].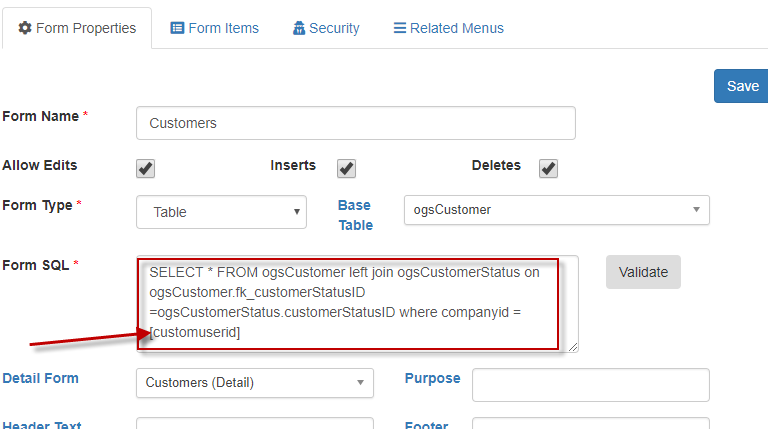
Writing Data with a User's Identifier
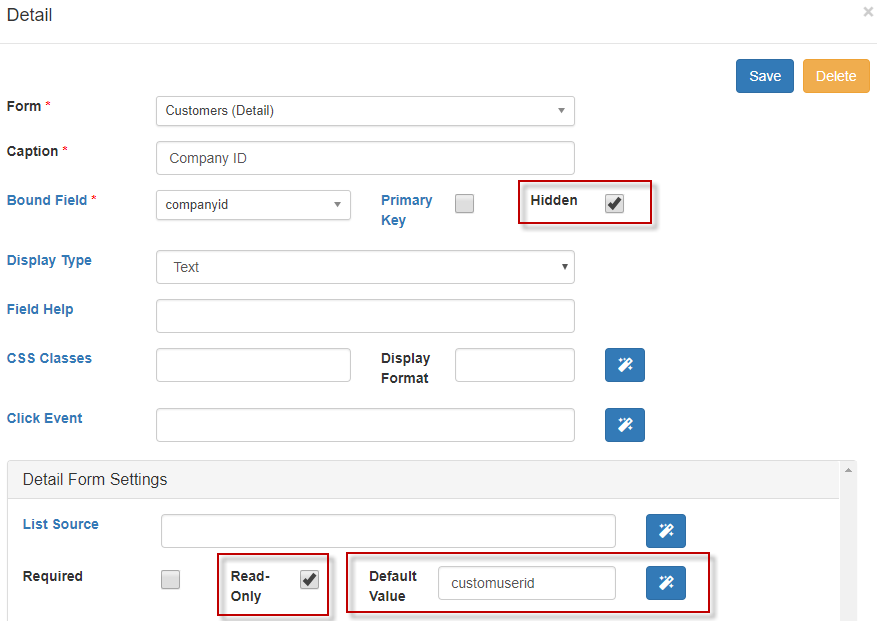
In addition to filtering data to just a user's assigned identifier, you can also automatically write new records to your database using that user's assigned custom_id. This is particularly important to ensure any records they add to the system are visible to them later. To write the custom_id to your database, create a new field on your Detail form, assign it to the field you want to write to, and then assign the Default Value to 'customuserid' as shown below.Tips:
- Make the field Read-Only always so the user can't manipulate the value.
- Consider making the field Hidden so they can't see the value being written.
- You can use the wizard to add the default value.
Displaying the Custom Logo and Application Name at Login
To display your user's custom logo and application name at login, as opposed to the default logo and application name, Vivaldi needs to know what custom_id that user is associated with before they login. The only way to do that is to provide your users with a login URL that includes the parameter custom_id that will identify their assigned tenant. After they log in, their assigned custom_id will be used (i.e., they can't access data they shouldn't just because they try to manipulate the login parameter).The URL you provide them should look like this:
yourhost/yourfolder/login.php?custom_id=1
Where the custom_id is the tenant identifier for that user.